 The original Van Gogh brush does indeed have a nice quality all to itself. Here I use the original brush, with some color jitter applied, and a bit of artistic fakery to create a bit of Starry Night magic. This shows how it was originally intended to work. You can use this technique with cloning as well, to great effect.
Here I am using Dab Type Circular, Stroke Type Multi, with a Soft Cover method. Jitter is set to the maximum, and Bristles (under Rake) set to 30.
This produces the original Van Gogh brush effect. I used this in several images released with Painter 1.0, and offered to the press.
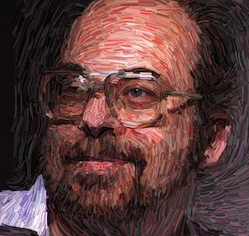
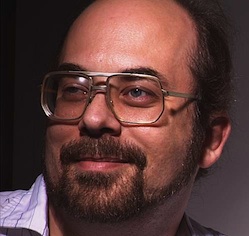 In particular, I took this image of myself with a video frame grabber on September 9, 1991, and applied the Van Gogh brush look to the image, using clone color.
You may notice that I missed the eye. Oops! Well, I didn't release this one to the press. It was drawn on September 17, 1991. Painter had only been released the previous month.
So this is me, right at the time that Painter 1.0 came out. And look, I still had some hair! OK, it doesn't show my pony tail...
 I probably should have done a still-life instead. I think I was a little embarrassed at my proud pose. And self-conscious about my left eye, which opens a bit larger than my right. And look at those huge glasses! Weren't the 90s fun?
I think there's too much color jitter. But it certainly illustrated the cloning capabilities of the Van Gogh brush.

Also note that the rake brush has a separate color for each prong of the rake, which is compatible with color jitter. It made for a nice effect, and it was also a bit useful for cloning.
But, as you can see, it was limited to parallel lines, and this limited the scope of the brush tremendously to me. Of course, you can make the size change using pressure.
 In Painter 3, I invented the bristle brush. It is now available under the Static Bristle Dab Type. I have used this brush as a smear brush to smudge around some color I also applied with the same brush, but with resaturation set to 1.0. Also, the spacing for the static bristle brush needs to be set to a very small amount - perhaps 1 or 2 percent. This is because the bristles are quite small compared to the radius.
It does indeed produce a nice smeary result, with the effect of bristles. But, with only one color well, this was a limited approach, and I think it is most useful for smearing. As a result of only having one color well, it can smear more than the camel hair brush, simply because the well color is applied to a larger area. This is the same effect, essentially, that made Just Add Water so useful in the early days of Painter.
 In Painter 6, we went wild with the new brush engine. This resulted in several new kinds of brushes. In particular, the camel hair brush shows the value of this new approach. Now the color can be smeared by each bristle of the brush, and so there are streaks along the brush strokes that make it seem much more realistic.
Here you see the camel hair blend brush, which obviously uses a better internal color well to keep its color around. The brush quickly gets muddied by the colors of the canvas, and this makes is very useful indeed.
 But the most important part of the camel hair brush is that each bristle gets its own life. As you can see in this example, each bristle has its own path through the canvas, its own color, its own color well (and thus smearing and color loading potential), and its own identity.
With all the work on bristle modeling, sometimes I forget that I was also creating things that were never seen before, like the line airbrush. This brush used the spatter airbrush model for 3D position of the stylus and also its projection technique for positioning each spatter of paint, but instead rendered the spatter as a line in the direction it was projected.
 This created some of the more interesting art I have ever created.
Here you see one stroke of the line airbrush, with spread set to 72 degrees. I held the stylus at a significant tilt from the vertical to get this result, in the same exact manner you would direct an airbrush to overspray.
But the lines give it an extra added dimension that really can't be had in any other application.
In the next post on Painter's brushes, I'll talk about more of the style-extending reality-defying brushes and some of the craziness that occurred during the late 90s at Fractal Design.
We were just plain out of control!
No comments:
Post a Comment